Table of Contents
Acoustic treatment is the most impactful upgrade you can make to your home studio, but commercial acoustic panels are expensive. A single 2x4 foot panel from a major brand can cost $50 to $100, and treating a room properly requires at least a dozen panels. Fortunately, you can build professional-grade acoustic treatment for a fraction of the cost using basic materials and simple construction techniques. This guide covers how to treat your room effectively without spending thousands of dollars.
Key Takeaways
- DIY panels cost 50-70 percent less than commercial panels with equivalent performance
- Treat first reflection points and corners before adding more panels anywhere else
- Mineral wool or fiberglass insulation is the core material follow safety precautions
- A $200 DIY treatment budget can dramatically improve a small room
- Furniture, bookshelves, and thick curtains are partial alternatives to dedicated treatment
Treatment Priorities: Where to Start
Acoustic treatment follows the law of diminishing returns. The first few panels make a dramatic difference. Additional panels provide smaller improvements. Spending your budget strategically means treating the most impactful locations first.
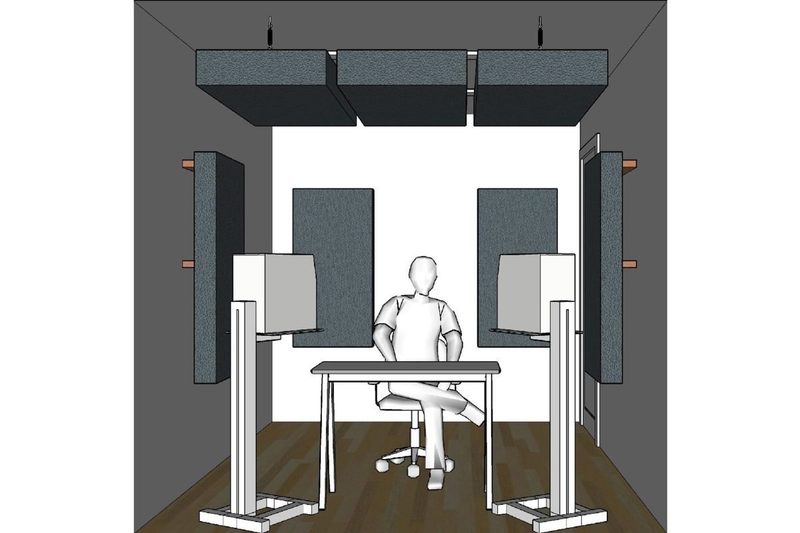
First reflection points. These are the points on the side walls, ceiling, and desk where sound from your monitors reflects directly to your ears. Treating these eliminates the comb filtering and phase cancellation that makes mix translation unreliable. Use the mirror method: place a mirror on the wall at listening position. If you can see a monitor reflected, that is a first reflection point.
Corners for bass control. Low frequencies accumulate in room corners, causing uneven bass response. Corner bass traps are the single most effective treatment for improving mix accuracy. Treating all four vertical corners of your room will dramatically reduce boominess and give you a more accurate low-end picture.
Rear wall. The wall behind your listening position creates reflections that reach your ears slightly delayed from the direct sound. A thick panel or diffusion on the rear wall cleans up the stereo image and improves depth perception. This is the third priority after first reflections and corners.
DIY Acoustic Panels
Building your own acoustic panels is straightforward and requires no special skills. A single 2x4 foot panel costs roughly $15 to $25 in materials compared to $50 to $100 for a commercial equivalent.
Materials per panel. You need a 2x4 foot piece of rigid fiberglass or mineral wool (OC 703, Rockwool Rockboard 60, or equivalent), a 2x4 foot wooden frame made from 1x4 lumber, fabric for the front (burlap, Guilford of Maine, or breathable speaker cloth), spray adhesive, and a staple gun. Total material cost per panel is about $15 to $25.
Construction steps. Build a 2x4 foot frame from 1x4 lumber with a center support brace. Cut the rigid insulation to fit snugly inside the frame. Spray adhesive on the frame and attach the insulation. Stretch the fabric tightly over the front and staple it to the back of the frame. Add mounting hardware picture-hanging brackets or French cleats on the back.
Safety precautions. Wear a respirator, gloves, and long sleeves when cutting fiberglass or mineral wool. The tiny fibers irritate skin and lungs. Cut the material outdoors or in a well-ventilated area. Use a sharp utility knife with a straightedge guide. Score the material deeply, then snap it along the score line.
DIY Bass Traps
Bass traps are thicker than regular absorption panels because low-frequency waves are longer and require more material to absorb effectively. Corner bass traps are the most effective placement.
Corner stack traps. The simplest bass trap design is a triangular stack in the corner. Cut rigid insulation into triangles 24 inches wide at the base and stack them from floor to ceiling. Cover the stack with fabric using a simple sleeve or wrap. This is the most cost-effective bass treatment and can be built for under $50 per corner.
Super chunk traps. A super chunk trap fills the entire corner triangle with insulation. Use multiple layers of rigid fiberglass or mineral wool cut into triangles and stacked. The depth of the trap determines the lowest frequency it can absorb. A 24-inch super chunk trap absorbs significantly lower frequencies than a 12-inch panel.
Panel traps with air gap. A regular panel becomes a more effective bass trap when mounted with an air gap behind it. The air gap extends the effective depth of the absorber. Mounting a 4-inch panel with a 4-inch air gap performs similarly to an 8-inch panel. Use furring strips or standoff brackets to create the air gap.
An air gap behind any absorption panel doubles its effectiveness at low frequencies. This is the cheapest way to improve bass trapping without adding more material.
Choosing the Right Materials
The material inside your panels determines their acoustic performance. Not all insulation is created equal for acoustic purposes. Choosing the right material ensures your DIY panels actually work.
Rigid fiberglass. Owens Corning 703 (4 feet by 2 feet, 2 inches thick, 3 pounds per cubic foot density) is the industry standard for acoustic panels. It is easy to cut, holds its shape well, and provides consistent absorption across the frequency spectrum. OC 705 (6 pounds per cubic foot) is denser and better for low-frequency absorption but harder to cut. A box of 12 panels costs about $100 to $150.
Mineral wool. Rockwool Rockboard 60 or Roxul AFB are excellent alternatives to fiberglass. They are slightly more rigid, easier to cut cleanly, and less irritating to work with. Mineral wool also has better low-frequency absorption characteristics than fiberglass at the same thickness. A box of 6 panels (2x4 feet, 2 inches thick) costs about $60 to $80.
Materials to avoid. Do not use open-cell foam (acoustic foam tiles), mattress toppers, carpet padding, or fiberglass insulation batts. Acoustic foam only absorbs high frequencies, creating an unbalanced room that sounds dead but has serious low-frequency issues. Rigid insulation is the only material that provides broadband absorption across the full frequency spectrum.
Budget-Friendly Alternatives
If you cannot build DIY panels immediately, several household items can improve your room acoustics at minimal cost. These are not replacements for proper treatment but are better than nothing.
Bookshelves. A bookshelf filled with books of varying sizes acts as an effective diffuser. The irregular surface scatters sound reflections rather than absorbing them. Place bookshelves on the rear wall behind your listening position. Bookshelf diffusion is particularly effective at breaking up flutter echo without making the room sound dead.
Thick curtains and blankets. Heavy, dense curtains absorb mid and high frequencies. Moving blankets hung from the ceiling or on walls provide temporary absorption for recording sessions. Thick comforters or duvets can be draped over chairs or mic stands to create a makeshift recording booth. These are not permanent solutions but work well for specific recording situations.
Rug on bare floors. A thick, dense carpet or rug with a heavy pad reduces floor reflections significantly. If your room has hard floors, covering at least sixty percent of the floor area between you and your monitors reduces comb filtering from floor reflections. This is often the cheapest per-square-foot acoustic improvement you can make.
Panel Placement Strategy
Where you place your panels matters as much as how many you have. Strategic placement maximizes the effectiveness of each panel.
Phase 1: Essentials. Treat the first reflection points on both side walls. If your ceiling is low (under eight feet), treat the ceiling reflection point as well. Place 4-inch thick bass traps in at least two corners. This phase requires 4 to 6 panels and 2 to 4 corner traps. Cost with DIY: roughly $150 to $250.
Phase 2: Extended. Add a panel on the rear wall behind your listening position. Add bass traps to the remaining corners. Place panels at the wall behind your monitors if the monitors are close to the wall. This phase adds 2 to 4 panels and 2 corner traps. Phase 2 brings your room to a professional monitoring standard for most home studio work.
Phase 3: Refinement. Add additional panels to address specific problem frequencies identified through measurement. Use a measurement microphone and Room EQ Wizard (free software) to identify remaining acoustic issues. Add targeted treatment based on measurement data rather than guessing. This phase is optional and depends on your room's specific characteristics.
Acoustic Treatment Budget Plan
| Budget | Treatment | Materials |
|---|---|---|
| $50 | Corner bass traps (2 corners) | 6 panels rigid insulation cut into triangles |
| $100 | Phase 1 essentials (no corners) | 4 panels rigid insulation + fabric + wood |
| $200 | Complete Phase 1 | 6 panels + corner traps for first reflections + 4 corners |
| $350 | Phase 1 + most of Phase 2 | 10 panels + all corners + rear wall treatment |
| $500 | Full room treatment | 14-18 panels + all corners + ceiling cloud + rear diffusion |
Frequently Asked Questions
Is acoustic foam worth buying?
Acoustic foam tiles (the wedges or egg crate shapes) only absorb high frequencies. They create an unbalanced acoustic environment where mids and highs are dead but low frequencies are uncontrolled. This leads to boomy, inaccurate mixes. If you already own foam, use it for high-frequency flutter echo spots, but do not rely on it as your primary treatment.